Tuesday, April 29, 2014

Holtwood House // Edibles Garden Progress


So many times I wait to share a project around the house because it's not quite yet finished. But there is often an exciting moment to be shared at each project milestone. We recently finished building the foundation for our edibles garden and even in its half-done state, it gives me a little thrill each evening when I round the corner to see what we've accomplished.


We have our share of nightly crawlers - raccoons, possums and skunks among them. To keep our future bounty from being picked over each night, we built a screening system for the redwood raised beds we built last year, that would allow us to batten down the hatches so to speak at the end of the day and preserve the day's growth. Each side screen can be lifted and propped up with a 2x4 during the day by the pretty brass handles my husband installed. An eye hook secures them to the bed once reclined again each night.  The beds themselves also got a bit of a reboot. I sanded and then weatherproofed them with a soy-based sealer to help keep the wood from drying out under the hot California sun this summer.


Our herb table serves as a backdrop to the rest of the garden.  Before planting, I painted various pots - some new and some old - black for a uniform palette. I love how the deep hue of the pots brings out the colors in the foliage. A wall fountain once handed down to us many years ago got a fresh coat of paint and new motor and now presides happily over our flock of herbs and cacti sitting on the table below. I'll be sure to get a few more shots of the table itself at some point, built from a pile of old cinderblock and spare lumber we had stacked up out back. The cinderblocks were painted black as well and blend discreetly into the adjacent fence line.
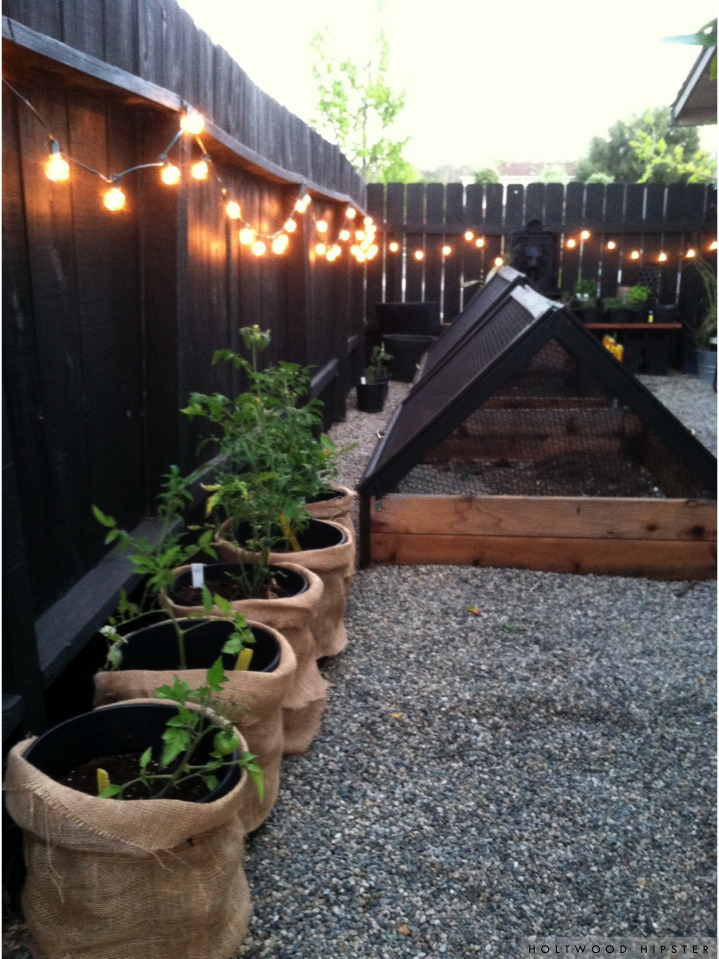

The view of the garden on approach gets me every time. You can glimpse a peek through the lemon tree from our pool. We had that in mind when we hung the string lighting along the fence. The Mister wanted a bocce court. I wanted vegetables. In the end, we came together and made this little piece of heaven for ourselves. Even though the beds still lay bare, it's become one of our favorite little corners in our yard. 

***Here's where we started and finished back in 2012

photos by holtwood hipster
SHARE:

Thursday, April 24, 2014

Guest Bath Redux // ORC Week 4

It's already Week 4 of the One Room Challenge and today I'm linking back up with many of my fellow 'design addicted' web-mates over on Linda's blog Calling it Home to showcase my progress on the one room that has been a challenge for me over the last three years. I'm not going to beat around the bush today... by the end of this post, I'm going to pull back the curtain a bit and reveal my favorite part of this guest bath transformation. 


But let me first lay the groundwork. The palette for my guest bath design really took shape from what would become of the counters. I knew all along the adjacent walls would be white and because we have already had a lot of success with Benjamin Moore's 'White Dove' elsewhere in the house, I decided that color would also appear here. I tested it against a brighter, truer white, painting a swatches right beside our dated bath tile and 'White Dove' won out for it's creamy undertones. Plain and simple- it actually complimented our tile quite well.

On the wall, 'White Dove' looks fresh and clean. I plan to pair it up with some of creamier tones to compliment and balance earthy colors that made their way onto our vanity. Mixed metals is my jam, so I'm mix-mastering it up with both polished and brushed brass accents and chrome fixtures.

The whole bathroom reno centers around these counters. You may have thought it was all about the paneled walls. That was a happy side outcome. What really motivated me to focus on this room for the ORC was the fact that I saw no end in sight to the 7 feet of outdated, shiny black laminate countertops. It was one of those unfortunate relics left behind from the previous owner that nagged at me day in and day out as dust and watermarks constantly blanketed the surface. A 7ft piece of stone is out of our budget for the moment, so I set to scheming, intending all along to transform this blight on my bathroom into the concrete counter of my dreams.
 There are many tutorials on Ardex Feather Finish applications out there. Though it is intended to fill cracks and smooth concrete flooring in preparation for tiling and other professional finishes, I may have found my soulmate in this versatile product. I tested the waters on a smaller wet bar counter in our dining room and realized through that experience what tools I would need to make the lengthier vanity top a smoother experience. In the end, I used everything from concrete and drywall tools to my mini cake spatula to get just the application I wanted. Three coats of Ardex, sanding in between with 220 grit paper and two coats of sealer later and I had it, the concrete counter of my dreams. 
For the first few days thereafter, I thought it couldn't get any better. But then, I found the paint color for the base drawers and cupboards. I thought for sure I'd go white or dark charcoal gray. I'm glad I decided to take a chance with Benjamin Moore's Aura line and a greenish-gray they call Rainstorm. I mean... I walk into the room just to stare at the richness of it all day long. In a surprise development, it's the scene stealer- not the glorious concrete countertops after all. The matte counters, flat color on the cabinets and polished brass pulls reassured me that I was moving in the right direction with this reno. That leaves just two short weeks to iron out all the little details before the big reveal. 

You can read about my plan and weekly progress here:


Be sure to check out progress by all the talented bloggers linking up today over at Calling it Home.
SHARE:

Tuesday, April 22, 2014

Make This // Lobster Cage Pendants


Where do you want your lobster traps hung? We were getting ready for a little shindig at the house over this past weekend and thought we'd add a little mood lighting in one of the far corners of the yard with the bamboo pendants I had made the week before. Until then, I didn't see it. I had envisioned calling them "netted bamboo pendants" or something of that sort for this post. But it wouldn't be the first time The Mister saw something different than I did in one of my projects. 

Lobster cage or not, I liked them. I liked them a lot - especially once the black netting harnessed the soft glow of the filament bulbs we placed in them that evening for our party. 

They were a cinch to put together too. Here's how I did it:


I took inspiration from the Ay Illuminate pendants I gushed over in a recent post. Though much more low brow than the fancy designer pendants I have such an affection for, I think my version captures a similar vibe - no fuss, rustic simplicity using minimal materials to create a statement all its own. 

SHARE:

Thursday, April 17, 2014

Guest Bath Redux // Week 3 One Room Challenge Link Up


It's time to link up for Week 3 of The One Room Challenge and today I'm sharing more developments on what we are calling our Guest Bath Redux. A 6-week deadline is motivation enough for steady progress and wouldn't you know, we're moving right along with this renovation and have finally gotten into some of the prettier moments and lighter DIY projects. 

Not caught up yet? You can always read more about the game plan (Week 1) and the most impactful change to come out of this renovation (Week 2) in earlier posts.


----------------------------------------------------------------------

Perhaps we should really be talking paint colors before accessories, but that post will have to wait. You see, I'm holding out on the paint discussion because that will also involve the vanity and well... I'm just not yet ready to reveal that perfect little piece of this puzzle. So let's get to some of the other ways we're working to achieve our desert.modern.luxe vibe for this galley bath. 

Gold Leaf Mirrors
I took an evening and gold leafed both of the existing Ikea Grundtahl mirrors. I had kicked around the idea of spray paint, but decided in the end that the result would be too flat and not really arrive at the right contrast I was hoping for against the pristine white breadboard backdrop. I opted instead to apply Gold Leaf sheets and even left some of the areas around the frame looking a bit distressed. 


Vanity Stool
I've had a deco style vanity stool sitting alongside the tub for months now. I had picked it up on a whim at Home Goods, sure that I'd eventually give it a little makeover. While most of the other elements in the space will remain neutral, I'm looking to add a little pop of pattern or color to the room through this stool. Those chrome legs might even end up gold. I'm still up in the air on that one, just as I am the final pattern for the seat, though I'm currently floating several potential solutions.


 Gold Pendants
Speaking of gold, the commercial grade stainless finish on our IKEA pendants (discontinued) got made over with my favorite Rustoleum spray paint. The shiny gold bases are the start of the mixed metal look that I'm planning to weave throughout the bath. We saved a little dough by recycling the fixtures, while  achieving an elevated look in just a couple of quick coats. Win, win. 


  Shower Doors
Sayonara you dated and mismatched shower doors. Oh I couldn't wait to get rid of you! True, their absence now reveals a dated square tile backsplash, but I'm going to make lemons from that lemonade. The tile is white and in good shape, as is the tub so I'll be polishing that 80's tile job up and will make do for the next 5 or 6 years until we are ready to really renovate the shower area. For now, it's appealing to my love of all things "geometric" and it's staying.

So that's where we are at the half-way point on this project.  Next week, I'll let you in on the some of big makeover changes happening along that 7 foot vanity. 

Until then, be sure to check out some of the progress by my determined and talented blogger friends linking up with Linda today over at Calling it Home.


Follow along on Instagram for continued ORC progress and sneak peeks!
SHARE:
© Holtwood Hipster. All rights reserved.
Blogger Templates by pipdig