Thursday, October 12, 2017

Week 2 // Fall One Room Challenge: California Casual Living Room

Vanessa Alexander

Today we round the corner into Week 2 of the One Room Challenge, a biannual room makeover event hosted by Linda of Calling it Home.  Last week, I shared a look at the evolution of my living room - my focus for this challenge - and how it has slowly morphed through renovation and decor trends over the last 7 years.   This week, I am checking in with you to share more about my direction and the design influences for the California Casual design I will reveal on November 9. 

We've lived in our home while we've renovated and over time, focused sporadically on each room as budget has allowed. Two recent changes - a new floor and our recent kitchen remodel - have both helped solidify our design plan and created an easier, open feeling flow from room to room.  As I work to complete a more finished look with our adjacent living room and adjoined dining area, its important to me to not only create something complimentary to other rooms in the house, but continue with something that is aesthetically aligned with aspects that are important to my husband and I in our private living space.  In the end, what will our living room reflect about us and how will we live in it?

Design Influences

California Casual is a style that has recently come into better focus through the widely published work of local California designers. But I feel like its been evolving for quite some time. I can think back to places I frequented as a kid in the 80's and remember hints of what it has now become embedded into those early furnishings.  Nostalgia aside, what has drawn me most to this style are the airy rooms, earthy, muted tones, clean lines and soft textiles - all things that are comfortable and soothing for two people who spend most of their time saddled in front of a computer or navigating their way through LA traffic all day.

Amber Lewis

Laura Singleton

Surf Shack - Photo by Brittany Ambridge

Design Goals

Our design goals for this space are well defined and will continue to unify the rooms throughout the house. We will transition away from trendy accessories (many still packed away from when we put the floor in this past Spring) and work toward something modern, but a little more timeless.  


In next Thursday's update, I will share work in progress and a first look at some of the materials that will be brought into the room ahead of the final reveal. In the meantime, catch sneak peeks on Instagram (@HoltwoodHipster) and be sure to check out progress by the other guest participants on Calling it Home.


SHARE:

Wednesday, May 10, 2017

ONE ROOM CHALLENGE // WEEK 6 - THE REVEAL // MODERN RANCH-STYLE KITCHEN

Farm-house Kitchen; One Room Challenge

Just 6 weeks ago, we embarked on a long awaited kitchen remodel, complete with new countertops, tile and appliances for our 1960's era kitchen.  Throughout this time, I blogged weekly about our progress and shared some of the triumphs and challenges encountered as a guest participant in the One Room Challenge along the way. For this redesign in such a crucial area of our home, we chose not to move walls or replace cabinetry, but instead transformed these well loved bones with a contrasting paint and materials scheme that also complemented new white oak flooring replaced at the same time throughout the entire house. 

Wanna see a really good before and after? You can catch up and see where we started HERE

SHARE:

Thursday, April 6, 2017

ONE ROOM CHALLENGE // WEEK 1 // MODERN RANCH-STYLE KITCHEN

Good news. This before also has an after - before the after. 

Welcome to Week 1 of The One Room Challenge, the bi-annual, room makeover bonanza created by Linda of Calling it Home. This virtual event takes the design community by storm - and unites bloggers and design enthusiasts alike - inspiring, motivating and creating virtual friendships all around. All eyes will be on the twenty design bloggers hand-picked to lead the charge in making over a room of their choice over the course of 6 weeks, all the whilst blogging and photographing their progress on Wednesday of each week. 

How do I fit in? I'm throwing my hat into the ring each Thursday as a guest participant after a two-season hiatus from the event- and frankly, a much, much too long break away from the ol' blog. 

I've really missed it. 
I've really missed you- and my hope is that this event will bring me back around to doing something I truly love - connecting with you all about our homes and the big (and even not so big) things we do around them to make life more comfortable, efficient and most certainly pretty. 

This round - I'm completing the long-awaited remodel on our kitchen.

This will be the fifth space in our home I've tackled thanks in part to all the moral support I've received from so many of you throughout previous ORC seasons. Check out previous designs completed for our guest bathmaster bedroom, my husband's home office and my own home-based workspace.

So let's get to it.

These are the current bones I'm working with:

But it hasn't always looked like this. This is actually the transitional "after" that has served us well for the last six years while we planned and plotted for the eventual overhaul of this space. When we moved in, we assumed a clean, but dated kitchen area from the original homeowners - complete with tile counters, cabinetry and layout circa 1967. We gussied it up and made it work for us for the short term with some paint, shiny new appliances, hardware and fixtures. But functionally speaking, it has had some modern day challenges for us that I hope will be solved for under the redesign.

Wanna see what it looked like when we moved in? 
 Fast forward to today's landscape. We actually have utilized the room off the kitchen as sort of the eat-in area, complete with built in-bar. So this makeover will include both the immediate cooking and dining areas.

This is the most lived in and traveled room in our house. We cook big family meals here, entertain around our bar and open the slider to wet pool guests running in to use the bathroom. It's a critical space for us and one we want to make work more efficiently. 

Next week - more about our current state, the things we hope to change over the next six weeks and the plan to get us there.


In the meantime, please be sure to check out all of the other designs in the works by 200+ talented design enthusiasts and bloggers over at Calling It Home.


SHARE:

Thursday, November 12, 2015

ONE ROOM CHALLENGE // THE REVEAL

One Room Challenge Black and White Gallery Wall

 It's the end of the Fall 2015 edition of the One Room Challenge, created and hosted by Linda of Calling it Home (I made it all the way through- whew!). Over these last 6-weeks, I've shared plans, progress and lots of sneak peeks for my guest room turned in-home office space. Today, I'm happy to finally reveal the finished design in its entirety. 

One Room Challenge Black and White Interiors Gallery Wall

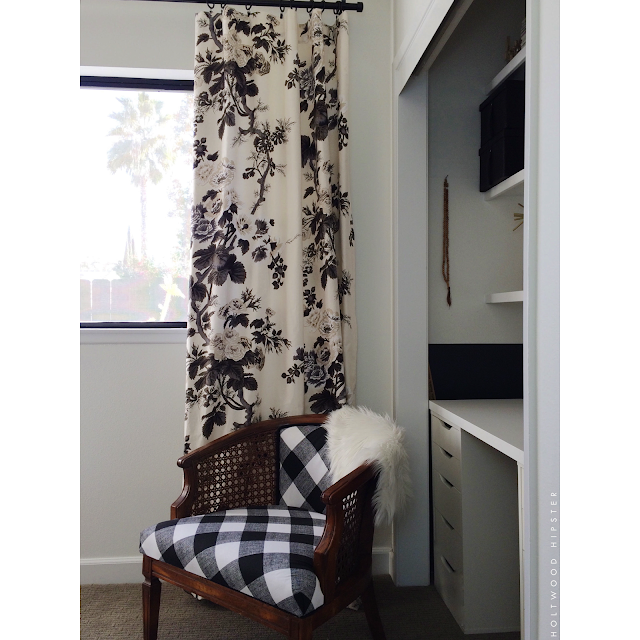
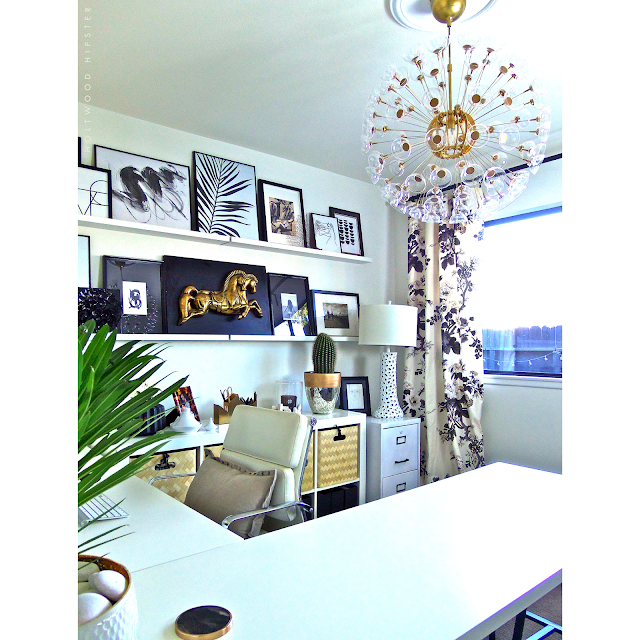
What a whirlwind the past few weeks have been. After starting with a relatively blank slate, I got off to a quick start and made lots of progress between Weeks 1 and 2. I painted, Dad came by to help me hang the picture ledges and build out the shelves and I finished the light fixture revamp. I also got through some of the more hands on projects like the lined 'Pyne Hollyhock' drapery panels and buffalo check upholstery on my curbside find in Weeks 3 and 4. But somewhere between Weeks 4 and 6, the project caught up with me and I found myself hung up on the final accessories and styling. As it always does, it all came together over the past weekend - just hours before I was able to get the room photographed for the reveal. 


One Room Challenge Black and White Gallery Wall

In all honesty, I started working in the space before it was finished and I think that helped me make some of those final decisions I had been agonizing over. It was important to me to make sure that the space was functional as well as pretty. I also wanted to make it a true reflection of my personal style and a place that would make me feel motivated and productive each day while I worked in front of my computer. By moving in early, I was able to make sure I had lighting and a desk set up that was appropriate for the day to day grind - not just a pretty picture.

One Room Challenge Black and White Gallery Wall

I utilized a series of bins and files to organize my papers, magazine collection, fabric and project supplies. In styling the room, I also looked to some of my former display pieces like the mini tagines - which I now use (and display) desk side on the back console for paper clips and pins. I also incorporated an up-cycled filing cabinet (found at a local garage sale) to help keep important documents close at hand. I painted out the once dingy cream colored cabinet in white and the sprayed the hardware in a matte black, a scheme that now blends nicely into the other furniture in the room.

One Room Challenge Black and White Home Office

One Room Challenge Black and White Gallery Wall

My art collection came together pretty fluidly, from both flea market finds - like the mid-century gold horse plaque that was purchased long ago - and newly found treasures courtesy of Etsy. Some of these were even "print your own" images, purchased and downloaded for mere dollars. I used a selection of inexpensive, but well designed frames to showcase my finds and I'm really pleased with the result. To me, the gallery wall in particular and the room in general, was an exercise in designing with my heart and incorporating things that really spoke to me personally. Somehow, all of those individual elements came together into a cohesive design that was representative of my personal style. 

One Room Challenge Black and White Gallery Wall

One Room Challenge Black and White Gallery Wall

One Room Challenge Black and White Interiors Buffalo Check Chintz

As it always does, the One Room Challenge tested my DIY skills in new ways. I tackled the lined drapery panels in perhaps my favorite pattern ever - Schumacher's 'Pyne Hollyhock' - which frankly was a pretty smooth project thanks to an easy to follow blog tutorial. I also reupholstered my first chair, the most difficult part of which was breaking down the old upholstery - a testament to the quality of this old piece.

One Room Challenge

The closet demo gave way to a better utilized space, now organized to display more of my flea market finds and organize project materials. Truth be told, this area will likely evolve a bit as I fold in more supplies still hanging out in my old office space. But I've left plenty of room to organize and fill with more pretty woven bins to help conceal the chaos.

One Room Challenge Black and White Interiors Office Organization

One Room Challenge Black and White Buffalo Check Chintz

Black and White Home Office One Room Challenge

I kept my now spacious desktop simple and free of clutter. To give you a better idea of scale - that painting is a massive 40 x 40" and at least in photographs, it seems dwarfed on the wall above. Simple IKEA table tops paired with metal trestle style legs gave me more space to spread out my ongoing lists and daily planner each morning and keeps my workspace from feeling too confined.

One Room Challenge Black and White Gallery Wall Sputnik

This room gets the most glorious light throughout the day and has already been a big mood-lifter throughout my workday. 

One Room Challenge Black and White Gallery Wall

 I like to think my home will slowly be completed - one room at a time, every six months through the One Room Challenge. Setting a deadline on the internet is a big motivator to finally tackle a room like this that you know, just seemed to never really come together. It always feels good going into another season with a newly finished room - particularly one like the holiday season when the list of to-dos seems infinite. I can already feel a bit accomplished (and thankful!) walking into my new organized office space.

 A big thank you to Linda for hosting and for expanding the challenge to design enthusiasts like myself so that we might take part in all the fun. Be sure to check out reveals by all the bloggers who threw their hat in the ring this round. A big thank you to all who have supported with sweet comments here on the blog and on Instagram. I hope you will continue to follow along. Now that the challenge is over, I have a long list of design adventures still to share - floral projects and events as well as some still unrevealed renovations that have taken place here at the house. 

The 'before' and weekly progress on this room can be seen here:


Previous ORC reveals:

Guest Bath | Master Bedroom | Masculine Study 


SITE MAINTENANCE: 
A fresh, new look for Holtwood Hipster is currently in the works! Things may look a little sparse and formatting/fonts might seem a bit jumbled at the moment. But I'm excited to soon share a cleaner, easier to read layout that will help me better connect with all of you! Stay tuned...
SHARE:

Thursday, November 5, 2015

ONE ROOM CHALLENGE // WEEK 5


We are just a week away from next Thursday's reveal of the new in-home workspace that I've been designing for the Fall 2015 edition of the One Room Challenge. For today's update, I wanted to focus on some of the resources I've been leaning on throughout the last 5 weeks. I'm a big supporter of both small business go-getters and do-it-yourself warriors and my final design will feature the work and learnings from both. 

The gallery wall is nearly complete (I'm waiting on one more order from overseas - cross your fingers for me!). I have my selections matted, framed and put in place along the ledges Dad helped me hang in that first week. When sourcing artwork for our home, one of the first places I always look is Etsy. Where else can you access talented graphic designers, artists, photographers and vintage works all in one place? The pieces I chose are a composition of vintage and modern photography, sketch-works and hand-drawn graphics, some of which were affordably purchased as downloadable art that I took to my local copy house and printed for mere dollars. I've featured some of my selections and sources above. 

Camera Lucida is an Etsy shop devoted to vintage photography works largely focused on Americana. I chose one by depression era photographer Dorothea Lange and the works she did under the FSA capturing the harsh realities of the depression. I've always loved her work. While the irony in the image is not lost on me (these down on their luck cowboys no doubt are being taunted by the image in the billboard), I like to look at it a little differently and it will be a reminder to me in my work space that the easy road is not always the most suitable for travel. I also came upon the vintage 70's style sketches of artist Susan Brommelsiek in her Etsy shop "When I was 20". Her shop features sketches she did long ago while in art school and is well worth a look - particularly if you're looking to source tasteful nudes and anatomy studies. 


I also completed my first set of lined draperies using my beloved 'Pyne Hollyhock' from Schumacher. I was lucky enough to source the fabric from an overseas distributor as "seconds" quality for half the retail price. There is nothing to indicate anything inferior to the original in the yardage I received so I am still scratching my head at that one. I kicked around different styles - toying with idea of more formal pleating. In the end, I chose to hang them rather simply using clip rings and I'm really happy I went in this direction. I did line them and used inexpensive Ikea draperies (in the end, much cheaper and easier than if I had purchased fabric by the yard). I had never done a lined drape so I leaned on this very easy to follow tutorial put together by House of Hepworths. The tutorial shows you how to line panels using an inexpensive bed sheet. As an alternative, I opted to use Ikea Vivian panels (and flipped them upside down to leverage the 4" bound top which added weight to my panel bottom). 


I also previously shared a peek at the refurbished DIY shandy in Week 3. I had previously hacked a IKEA Maskros fixture following Jenny's lead from Little Green Notebook. It was starting to look worn and tired and quite honestly was too busy for the overall look I wanted in the new space. But I really still liked the footprint in the room and didn't want to toss it. I was lucky to find a more streamlined version by Bethany of Dwellings by Devore that translated into exactly what I was after. I disassembled the old fixture, repainted it and set about flanking it with simple catering cups (rather than the scalloped design I used previously). Like the tutorial, I opted to cut out gold circles and glue them on the inside base of the cup for a more polished look. I dug through my stash of old invitations and as luck would have it, I had some gold invites I was able to repurpose with the use of a 1" punch without any further purchase. 


One of my favorite projects from this round of the ORC is the barrel cane chair I was able to re-upholster in this black and white buffalo check pattern. I inherited the chair from my neighbor's curb and though the upholstery was in good condition, I wanted to update it with something both equal parts classic and modern. I was a little intimidated and again turned to both You Tube and online tutorials for help. One of the references I found particularly helpful was this one by Peacefully Home via Remodelholic. It helped me troubleshoot some of the tougher areas where I was not sure how to go about deconstructing and reassembling. There were certainly steps to take to ensure the chair went back together as it was intended to. It also helped that I took photos at each stage for later reference.


I'm pretty jazzed at this collision of pattern in the corner of my new office. Did you also catch the new look we gave the old aluminum frame with a little oil based black paint? 

I can't wait to show you the finished design next Thursday. Be sure to pop on back for the reveal of the full art gallery wall, closet organization system and a full look at all the details that came together in this space. In the meantime, my blogmates are sharing Week 5 progress over at Calling it Home. The last week is one of the hardest of the challenge and we can all use the support. 


SHARE:

Thursday, October 22, 2015

ONE WEEK CHALLENGE // WEEK 3


I've been parlaying all of my learnings from previous One Room Challenge projects (Bathroom, Master Bedroom, Masculine Study) and as of Week 3, find myself still fairly organized and on track to deliver this room on schedule. I'm transforming essentially a blank slate into a very personal space for myself, so I think that alone has helped ideas form and decisions get made pretty expeditiously. 

If you are new to my little corner of the blogosphere by way of the One Room Challenge, thanks for stopping by! My name is Erin and I'm transforming our former guest suite into my very own home office work studio. I work my day job from my home desk so the final space will need to be very tidy and bright and filled with things sure to inspire me through long workdays. I am also a creative and am looking for a way to integrate my overflowing project space into my home office a little more efficiently, so I am less likely to leave my project materials all over the house. 

I shared the room I'm focusing on in Week 1 and the inspiration for my design in Week 2.

 As I close out Week 3, I already have a good base going of paint in two of my favorite colors, long loved fabrics and new shelving. You guys, I scored the deal of the century on 7 meters of Schumacher 'Hollyhock Pyne' - a pattern I've always wanted to incorporate into my home. It's a funny little departure for someone like me who gravitates toward more minimal, modern designs. But if there was ever a floral for me, this is it.  This pretty design will become new draperies to soften up all of the edgy black and white elsewhere in the room. 


Perhaps the most thrilling part of the One Room Challenge for me is the way it pushes me to problem solve and take on physical challenges for myself. I dove right in on that closet just a day after emptying it and demo'd all of the typical closet structures myself. I repaired the drywall and then set to painting out a charcoal accent feature in the otherwise white closet.  I had purchased a bunch of these brackets from IKEA, convinced at some point they would become shelves in this space. Dad came by and blew through the list of stuff I asked for his help with and suddenly we found ourselves back at Home Depot for wood so that he could build out the shelves. I was so happy he convinced me to knock these off my own punch list and even happier with the way they came out. These will eventually become part of the command center for all of my project materials. 


We also got the picture ledges put up on the opposite wall. This is the foundation for the framed gallery wall I am composing (I'll share art selections in a future post!). I've been playing with frames and matting and new artwork has been arriving over the last couple of weeks that I can't wait to share.


That very same day, we pulled the old shandy down for a little rehab. I pulled off all the old accessories, gave it a new coat of 'brass' and reworked the tentacles a bit. Next week, I'll go into what I did here in further detail. 

So that will take us into Week 4 of the One Room Challenge. Have you seen all of the spectacular work my blogmates have been putting into their spaces? Be sure to hop on over and take a look at Calling it Home


SITE MAINTENANCE: 
A fresh, new look for Holtwood Hipster is currently in the works! Things may look a little sparse and formatting/fonts might seem a bit jumbled at the moment. But I'm excited to soon share a cleaner, easier to read layout that will help me better connect with all of you! Stay tuned...

SHARE:
© Holtwood Hipster. All rights reserved.
Blogger Templates by pipdig