Wednesday, November 15, 2017

ONE ROOM CHALLENGE REVEAL // CALIFORNIA CASUAL LIVINGROOM

One Room Challenge Makeover

One Room Challenge Makeover

Another One Room Challenge is finally in the books and today, I'm so excited to show you the result of our living room remodel.  While we have made several foundational improvements to this room in the years since we moved into our 1967 SoCal Rancher, it has never quite come together - until now. Truth be told, it has taken just 7 weeks to do what we have been seemingly working towards for 7 years. Today, I'm so proud to take you on a visual tour of the finished room and talk through some of the elements that were integral to bringing our long-intended vision to life.

You can can catch up on the "before" and weekly progress here:

Week 1  |  Week 2  |  Week 3  |  Week 4  |  Week 5  |  [Bonus!] Week 6 

One Room Challenge Makeover

With extensive renovations completed for our kitchen remodel during the last One Room Challenge [click here to see that!], this round was a nice respite from my typical DIY marathon and the ensuing project chaos that typically follows. Still, the redesign challenged me in other ways - budget and restraint quickly becoming the stressful undercurrents as I plotted and carried out our plan.

One Room Challenge Makeover

We retained many of the existing furniture pieces which helped save on cost and instead, relied heavily on new textiles, art and an edited collection of room accessories to change the entire vibe of the room.  Of course the new white oak flooring we installed throughout the house during the last One Room Challenge was the MVP element in the new design and was essential to pulling it all together.

One Room Challenge Makeover

We had two primary goals in mind as we planned and carried out this remodel. The first - we wanted to create a design more complimentary to other areas of the house and chiefly, that new kitchen we just completed. The second - we wanted this heavily used room to be a more accurate reflection of who we are and how we live. Part of that meant bringing in textural and visual elements that spoke to our love affair with our home state and marrying that up with the work I do in my online home goods shop, Bird + Belle.

Both goals ultimately influenced the art, accessories and new textile selections in the room.  

One Room Challenge Makeover

It was also important that this room not only look polished, but remain functional. We have two rambunctious dogs and while baby gates kept them at bay for the last couple of weeks while the room was completed, no doubt they will eventually reclaim this room for themselves. Because of this, it was important that the soft goods chosen were not fussy and could be cleaned as needed. We also plop ourselves down nightly on that giant sectional in front of our eyesore of a TV. It may not be the most design-worthy element, but our living room is for living and I think the final design remains true to that.

One Room Challenge Makeover 
One Room Challenge Makeover

I think the the bright neutral palette at work here challenges any prior conventions I may have had that said neutral is boring. In the early days when planning colors for our house at the paint counter, I could not have imagined a combination of tonal grays, beige, black and even brown to play together as cohesively. I was short-sighted in thinking we had to either carry grays, browns or color independently throughout the house and that was the source of a lot of early design frustration.

When I look at this reimagined room now, I see a balance of both warm and cool. While the sectional, rug and flooring read on the cooler side, the brass, natural wood accents and our original flagstone fireplace add those essential cozy overtones that keep this space comfortable and livable.

One Room Challenge Makeover

The room is a bit of a fishbowl with clear views into the side and backyard areas of our home. I've always seen this as an opportunity to bridge our outdoor areas with the interiors. Our poolside fire area visible from the north facing windows infuses some of that indoor-outdoor living California is famous for. But the side yard that can be seen from the 15ft bank of windows abutting the couch was the perfect place to showcase a shady side garden planted against the fence we share with our neighbor. I've been making small adjustments to this landscape for several years and with the current selection of native plants, it finally feels complimentary to the newly decorated room just inside.

One Room Challenge Makeover

The pillows, beads and vintage pottery were all pulled from my own stock of home goods at Bird + Belle. I must confess it occasionally happens. There are some things I find it simply too hard to part with! But most importantly, bringing in a treasure I dug through piles of oddball stuff to find from an estate sale I drove miles to attend and then pairing that up with pillows from the shop make this space much more personal to me. 

One Room Challenge MakeoverOne Room Challenge Makeover

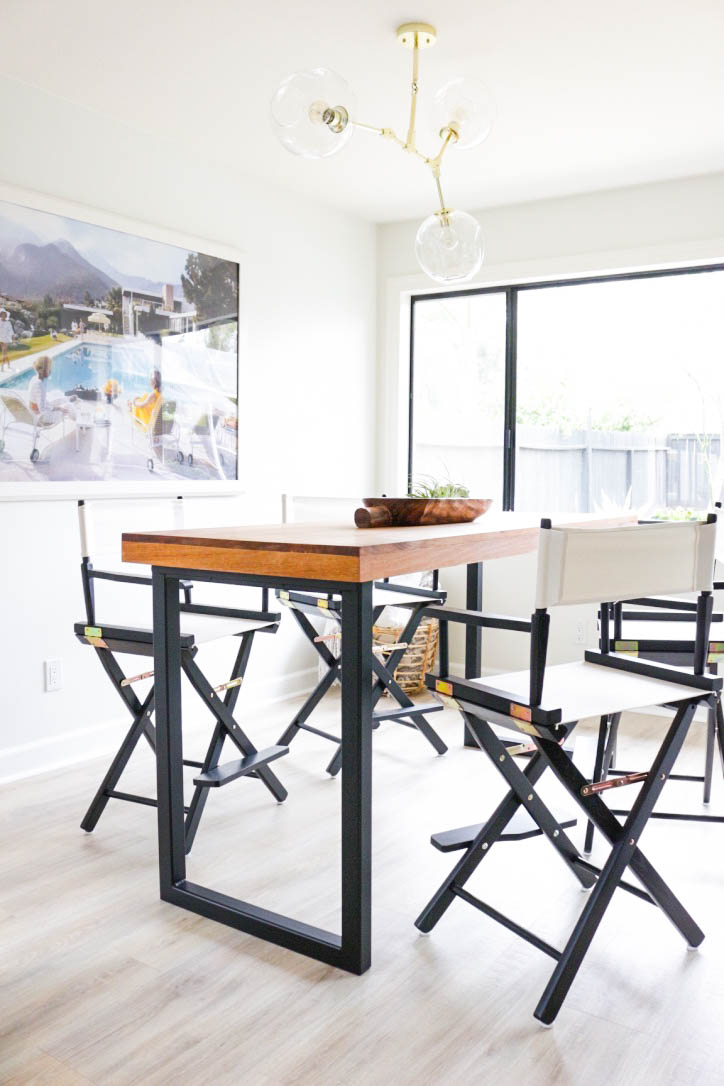
Our living room blends with an adjacent dining area that got a bit of work in the months between the spring and fall One Room Challenges. A new custom sized lighting fixture and the counter-height directors chairs we brought in have made this a functional addition to the sitting area in front of our TV. While we use our farmhouse table in the kitchen dining area for daily meals, the set up here provides additional seating when entertaining - something we do a lot of here at the house.
One Room Challenge Makeover

About the Slim Aarons photograph that hangs here... I realize it has gotten a bit trendy in recent years, but I have a personal affection for this piece that dates back a decade. We got married in a sprawling mid-century house in Palm Springs and on our first tour of the house, my eyes fixed on this very photograph for the first time hanging in the entry-way and I remember turning to my then fiance and I said... "When we finally have our own home someday, this is something I want to hang on our wall."  It may be a replica, but that memory is forever tied to this now popular poolside art piece and for that reason alone, I'm not sure I could ever part with it.

One Room Challenge Makeover

As someone who operates a small business, it was also important to me to support other makers and sellers putting themselves out there with their wares (see sources below). Many amongst the pared down grouping of accessories came from local, up before dawn flea market vendors. That vintage kilim rug came from an overseas Etsy shop I wholeheartedly recommend for the friendly customer service and incredibly speedy ship times (3 days from Instanbul you guys - like whoa...). Can you believe that four of the art pieces hanging on these walls came from a singular Etsy Shop? I simply purchased the download and printed and framed my own.  Even the custom light fixture over the dining table came from an Etsy shop, as did the fabricated black metal table base beneath it.

One Room Challenge Makeover

If you made it this far through the flood of photos, my humblest gratitude for allowing me to share my excitement over this project.  My sincerest thank you as well to One Room Challenge founder and organizer extraordinaire, Linda of Calling it Home. I've been pushed by these quick turn deadlines to finally finish off (5!) rooms in our home over the past couple of years and for that, plus the much needed motivation and the encouragement of the design blogger community, I am truly grateful. A thank you to ORC media sponsors House Beautiful and Home Love Network and to all of the other guest participants for their inspiring hard work over these past several weeks. Last but not least, a heartfelt thank you to all of you who have stopped in to take a peek or dropped a note to pump me up as I worked to complete this design.  The One Room Challenge is certainly one of those occasions when the blogging community really comes together to support one another and I walk away with not only a finished room to enjoy for the upcoming holiday, but appreciation to be part of that. 


***For more inspiration, check out the other Guest Participant Room Reveals at Calling it Home***


*Product Sources

Textiles:
Striped, Grain sack and Military Canvas Pillows: Bird + Belle
Draperies: Overstock
Roman Shades: Overstock
One of a Kind Vintage Kilim: Others at Lidya Kilim Rug
Hmong Batik Pillows: PureHomeLA
Zak + Fox Lumbar: Boho Pillow

Lighting:
Recessed Lighting: Trim Wholesale Lighting
Molecular Light Fixture: IntermountainLights (no longer on Etsy), but similar here
Brass Library Floor Lamp: Overstock

Art + Effects:
Vintage Pottery: Similar available at Bird + Belle
Art Prints: WildPrintCo
Bone Beads: Bird + Belle
Olive Tree: Rogers Gardens
Olive Tree Pottery: Village Nursery

Furniture + Flooring:
Flooring: San Marco Oak 
Drapery Rods: Overstock
Lounge Sectional: Crate + Barrel
Directors Chairs: Jet
Dining Table Base: Territory Designs (no longer on Etsy), but similar here


SHARE:

Thursday, November 2, 2017

WEEK 5 // ONE ROOM CHALLENGE: CALIFORNIA CASUAL LIVING ROOM


In today's post, I'm sharing another update on the road to our California Casual Living Room, designed for the One Room Challenge. In Week 5, I'm turning focus away from art and windows to the adjacent narrow dining area that is essentially an extension of this space. 

Just prior to the start of the fall edition of the One Room Challenge, there was already quite a bit of progress made here through paint, moldings and new wood flooring. The former owners had utilized this area as their formal dining room. But in designing some of the more functional aspects for our own use, my husband and I felt it important to keep it casual and skip any fuss. We designed and built our own counter-height dining table from simple steel legs, powder coated in black and a wood table top from African Mahogany. For the past couple of years, that is all that existed in this pocket of our extended living room - that is until this past summer when we added four director style chairs to the mix. 


New molecular-style statement lighting helped to create some visual interest here and casts a pretty glow from both inside and outside the expansive windows that look out onto our backyard fire pit. One of the challenges we've faced in this redesign was that the space is quite narrow and tunnel like. Adding a large scale mirror near the window allowed for a lot of natural light reflection within the space and helped us solve that design dilemma. 

You can also see in the before and in-progress after photos above that we worked a bit to update the original aluminum window with paint and molding - that is after we painstakingly scraped off the dated mirror-like film from said windows (THAT was fun, but sooo worth it).
This past week we also turned focus to the credenza area. We wanted to elevate our IKEA cabinets with a new top - to both warm up the ultra modern feel (hard to tell here, but the cabinet fronts are glossy white) and hide the cabinet seams visible from the top. The cabinet itself is working well and the fact that it floats helps to balance out the heaviness of the furniture in the center of the room.


I took a trip to our local lumberyard and had them cut some white oak boards to size. In the coming days, those boards will be glued up and refinished into a solid top which will then be screwed into our credenza for a more finished look. I'm already loving the way it ties in with the new floors.


So a quick update again this week, but things are progressing nicely. Our frames and artwork arrived just yesterday so my homework this evening will be to begin the framing process. Lots of anticipation for the outcome here. The artwork is one of the elements I'm relying on to help tie everything together for my design. Cross your fingers for me... 

In the meantime, be sure to check out the work in progress designs from nearly 200 other design bloggers over at Calling it Home, as they too burn the midnight oil to finish their spaces by November 16.


SHARE:

Thursday, October 26, 2017

WEEK 4 // FALL 2017 ONE ROOM CHALLENGE: CALIFORNIA CASUAL LIVINGROOM

Slow, but notable progress was made against my One Room Challenge living room design in Week 4. With art selections and other purchases that might otherwise delay an on-time finish finally completed, attention has been almost exclusively paid to the large wall of windows over the last few days. But before I talk about this aspect of my design plan, I want to share a bit about the work we did several months back to upgrade the windows. 


I should preface this part of my post by saying that the windows in this house were one of the things that attracted me to it in the first place. Plentiful and expansive, they allow a lot of light into the house - something my husband and I both prioritized while house hunting. Living in the house, we've been challenged with that same bright light that also brings with it a lot of afternoon heat which slowly worked to fade furniture and raise our electric bill. Furthermore, all the windows in the house were gray metal which did not provide a polished look within the interior.  We also painstakingly removed a reflective tint on the windows that had helped to filter the light, but looked ugly and dated. 


While we haven't yet made an investment in steel case windows, both paint and trim have gone a long way to lift the finish around our original, single pane 1960s windows.  That gray metal was painted out black using an oil based Rustoleum, which has held up very well to everyday use by the way. That allowed us to get the look of a steel case window while we save for the real thing.


As part of the One Room Challenge, my goal is to complete the design with woven roman shades to replace our current vinyl pull down shades and drapery. This past week, shades were delivered and mounted just outside each frame. A black metal wrap around curtain rod was hung high in preparation for ivory linen curtains which will be draped on each side of the frame.

I'm also giving you a sneak peek at the rug, which was unrolled so I could measure out and cut the padding I purchased to give our flat kilim a plusher appearance. 

Man, I love this rug. Tino, don't get any ideas. 


So while this week's update may not be especially exciting, progress made will undoubtedly make a big impact in my final finished design.

One thing to note - the reveal date for the guest edition of the One Room Challenge has been extended by one week. It's been a rough couple of months for some participants with fire, floods and other natural disasters. The additional week allows for a bit of catch up for those affected. So the new reveal date has now been set for Thursday, November 16. So mark your calendars - for over 200 inspiring before and after room reveals to be unleashed onto the interwebs. You can check out progress reports from all over at Calling it Home.


SHARE:

Thursday, May 4, 2017

ONE ROOM CHALLENGE // WEEK 5 // MODERN RANCH-STYLE KITCHEN


It's Week 5 of the One Room Challenge and I have a brief progress update for you on my ranch-style kitchen makeover. It's busy times over here! Afterall, I have just one week to go to make sure all the puzzle pieces come together for my design before revealing the final look to you all next Thursday! I actually plan on shooting the room over the weekend, so that means I'll be burning the midnight oil at the end of my real work day for the next couple of nights. 

SHARE:

Wednesday, April 26, 2017

ONE ROOM CHALLENGE // WEEK 4 // MODERN RANCH STYLE KITCHEN


Week 4 of the One Room Challenge always seems to sneak up on me. This is my fifth round as a Guest Participant in this bi-annual makeover event and just when I think I've figured out some sort of formula for balancing the work and progress reports efficiently, Week 4 sneaks in to remind me that I'm past the half-way point now and it's time to stop concepting and buying and just kick it into high gear and finish this room up. 

But I do have progress to report and actually when I look at it here, it's not a half-bad place to be. 


The biggest win - the counters are in and we have a sink. Guys, a kitchen renovation is no joke. We had set up a makeshift kitchen in our living room just to feel as if we had a home base of sorts, but for the most part we've been eating out for nearly every meal. The temporary loss of the sink was the biggest inconvenience though. We underestimated just how often we use the kitchen sink for hand-washing, rinsing out of cups, wiping down surfaces and so forth. So you can imagine how glad we were then when the sink finally arrived and we were able to install it along with these beautiful Silestone countertops. 


 Early on, I mentioned a farm-style table re-do and today, I'm happy to finally share more details on this makeover with you. If you are following me on Instagram, you may have already seen some of the transformation. But you need to see what the original table looked like to truly appreciate the impact of the before and after. Our table was quite dark and thickly layered in a brown town stain and lacquer finish. I was so worried that underneath all of that there would be some awful veneer that I could not do much sanding with. But to my happy surprise, this table was solid wood and stripped down to a very light natural wood - much lighter than what these pictures could capture.

I refinished the top in a weathered oak look, putting my own spin on a tried and true stain mix created by prettyhandygirl (see below for more details). I've actually used this same custom mixed stain previously on a couple of other projects and I knew it would get me close to what I was hoping for with this one.


The legs and accompanying bench were painted out in Valspar's "Tomcat" in Satin - a true, but just slightly softer black. I love the contrast and how the lighter table top brings both warmth and airiness to the dining space within the kitchen now.

As you can see at the top of my post, we also removed the over-range microwave and cabinet and started to build out a range hood with insert. This will open up the space above the range like we were hoping for and let a little more of that tile backsplash show through. The peninsula also got a wrapped lumber treatment to create a more solid and streamlined look for that part of the kitchen. 


As I mentioned in the last post - we decided to refinish our existing cabinetry in lieu of buying new. So one day, all the doors finally came off and my Pops took them home to sand them down and pretty them all up. We're so lucky to have him step in and help us (again) on this project! 

In demoing and prepping, we had to confront some bad drawer liner decisions (and I'm not referring to the 1970's daisy print you see going on there above). Guys - the sticky rubber shelf liners - don't do it. It's such a mess to get off and completely ineffective in areas like a pantry where liquids can seep through.

Because of built in niches within the cabinet fronts, we had to keep our existing copper hinges. So we sprayed them black for the lowers and white for the uppers so they would better blend into the face of the cabinet. 

One of the happiest moments of Week 4 for me came with the installation of white oak pantry shelves made by my husband and I. These are solid, pretty and super functional. I can't wait to show you how these turned out. Game-changer for us when we finally move back into the kitchen and hunt for that box of pasta or can of soup.

I'll have just one more week to show you my progress before the nail-bitting final reveal in two weeks. Until then, please check out all the amazing transformations taking place by other One Room Challenge Guest Participants over at Calling it Home.
SHARE:

Wednesday, April 19, 2017

ONE ROOM CHALLENGE // WEEK 3 // MODERN RANCH STYLE KITCHEN


It's Week 3 of the One Room Challenge and I am finally sharing a look at my design plan with you all for our soon to be modern ranch-style kitchen. 

You guys, this one has been a long time in the making.  I've been dreaming up this kitchen for many years, collecting inspiration from far away places we've visited, restaurants we've enjoyed meals in and designer kitchens I've admired. My mainstay neutrals of black, white and woodsy accents will come into play for the foundation, but I think my design will really take shape in the composition of lines, textures and mixed materials that will be put to use in the room.

For visual inspiration here, I am sharing four designer kitchen concepts above - a modern-rustic amalgamation of dark and light, each - a cook's kitchen to be sure. That vibe is ultimately what I want to achieve with my final reveal in 3 weeks.


I should stop and mention that I sort of dislike pigeonholing anything with labels. In the end, I'm hoping my design will stand on it's own and be a collective mix of several styles I admire and ultimately something appropriate to our home. 

But I'm hoping that by calling my design scheme "Modern Ranch Kitchen", that the moniker will resonate with someone out there searching through the 200+ guest participants in the One Room Challenge and pinpoint something they are looking to achieve in their own home - and that there is an aspect or two here that might work as inspiration for them too. I feel like that's how it's done best - we all get a little something from each other creatively to turn around and make it our own.

So with that out of the way - let's talk paint.


Budget always comes into play when renovating a room - or as we are doing at the moment - several in our home. So it was no surprise that we resisted temptation to move walls and install brand new cabinets and instead, opted to doll up the ones we already have. I don't look at this as a compromise though. I know the power of paint and I have one of the best painters in my back pocket. Yes, my Pops has returned for another round of the One Room Challenge and will be painting our cabinetry out in a two-toned scheme - light uppers, dark lowers.

I've tested paint samples for months by the way - knowing our kitchen looks different in the Spring than it does in the Fall. The five that got slapped on our pantry cabinet a couple of weeks ago made the final cut and ultimately - we had a winner and I have to say, it was completely unexpected.

They call it "Astronomical" and it really is to me. This dark grey cures with some khaki green and I've even seen some blue in there at the right time of day.  It will play nicely with our "house white"- White Dove featured just above.


We went with a slab of Silestone to withstand the wine and coffee beatings our peninsula will surely take on a daily basis. But you'll also find some beautiful wide plank Acacia wood countertops pulled in on the other side of the kitchen. These wood slabs are truly butter you guys and defy any of my old reservations about wood countertops. 

I'm also really excited by the irregular shape of our backsplash tile, though I'm sure it will present a couple of headaches in the installation process.

 Things will warm up in the adjacent dining area, where a textural mix of striped textiles, mixed metallics and woods will collide. There will be acacia and white oak, stripes on stripes and dark, matte hardware on detached cabinetry - much different from the chrome baubles on the kitchen doors.
I'm making over many of the pieces that already exist in this space to save on budget and well, honestly I couldn't find alternatives I really wanted to invest additional budget in. New paint and fabric finishes will make old new again.


Next week's post will be jam packed with progress pics. While I've been dilly dallying with "concept" posts here, we've actually been hard at work with tear down and the great "build back up" on this space. We hired a contractor to help us out this time and we've had a steady crew of construction guys and electricians to schedule around each other. I thought well ahead on this one and ordered up materials and yes, appliances (!) so we're tracking right on schedule for this 6 week project. 

Did I mention we also decided to tear out and replace the floors throughout the whole house as well?
It just happened, it really, really did.

See you back here next Thursday! In the meantime, please be sure to check out (and lend some support to) the other participants in the One Room Challenge over at Calling it Home.

Inspo image sources: [1] Devol Kitchens [2] Amber Interiors [3] BHG  [4] Blair Harris
SHARE:
© Holtwood Hipster. All rights reserved.
Blogger Templates by pipdig